In this post I want to show the beauty of infrastructure as code I’m currently adopting for a comprehensive configuration around an app deployment.
From Web hosting..#
Back in 2004 when I decided to build up an online presence I started like many other people by buying some web space combined with mailing capabilities, a small amount of databases and a web frontend (Plesk) to manage all. The most common method to self host web applications at that time was to put some PHP files on your webspace that may connect to a database. First I started with a CMS called Joomla for my personal homepage and 3 years later I decided to switch to a blog because it better reflects the type of content I want to contribute to the world. The weapon of choice was obviously the well known software Wordpress that can easily be uploaded to the aforementioned web space.
..to VPS..#
A decade later I wanted to self host other software like a mail server or web applications based on python. Therefore I switched from web hosting to a virtual private server (VPS) where I got root access to do virtually anything I could imagine. I first started by installing software directly on the host and a few year later the dockerization fever infected me. Every piece of software now runs in a container and in front of the web services there runs Traefik as reverse proxy. Although there is still manual configuration required like setting DNS records or configuring single sign-on for deploying a new web service.
..to the Cloud#
As time passes by and I gained new skills around Infrastructure as code the next level for me is to deploy an application, create it’s DNS record, setup the reverse proxy and additionally configure single sign-on in one shot! This involves to create resources on various platforms like my VPS for the web app, Cloudflare for DNS and reverse proxy using Cloudflare tunnel and Auth0 for single sign-on. One of the big advantages of infrastructure as code is that all dependant resources for a service are bound together and therefore share the lifecycle of the service! And the best is this can all be done using the free tiers of the SaaS platforms except the compute resources but this can also be run on a low cost Raspberry Pi at your home.
Here is the list of providers I used:
- Terraform Cloud (Free Tier)
- Cloudflare for DNS and Zero Trust Tunnel (Free Tier)
- Auth0 (Free Tier)
- VPS Server by Contabo (Paid)
So let’s go build something 🧑💻
Walkthrough#
In the next few sections I’m going through the setup of the terraform code to run Mealie, a self hosted web application for recpies, publishing it to the internet using Cloudflare tunnel and the single sign-on configuration using Auth0 as identity provider.
As a guideline I’m using Terraform best practices whenever possible.
This is my directory structure:
1
2
3
4
5
6
7
8
|
.
├── main.tf                 # Global resources like Cloudflare tunnel
├── mealie.tf               # Mealie DNS record, SSO config and docker container
├── provider.tf             # Terraform provider configuration
├── terraform.auto.tfvars   # Variable inputs (don't push to git repo!)
└── variables.tf            # Variable declarations

0 directories, 5 files
|
Cloudflare tunnel#
For simplicity I’m using Cloudflare tunnel as reverse proxy. This service is provided in a free plan with limited access to enterprise features like WAF rules and so on. But for self hosting some small apps or evaluating the capabilities of Cloudflare Zero Trust it is totally sufficient.
In the variables.tf file I declare three inputs
 1
 2
 3
 4
 5
 6
 7
 8
 9
10
11
12
13
14
|
variable "cf_account_id" {
  type        = string
  description = "Cloudflare account id"
}

variable "cf_api_token" {
  type        = string
  description = "Api token for Cloudflare zero trust and dns config"
}

variable "docker_host" {
  type        = string
  description = "Docker host to run configs on"
}
|
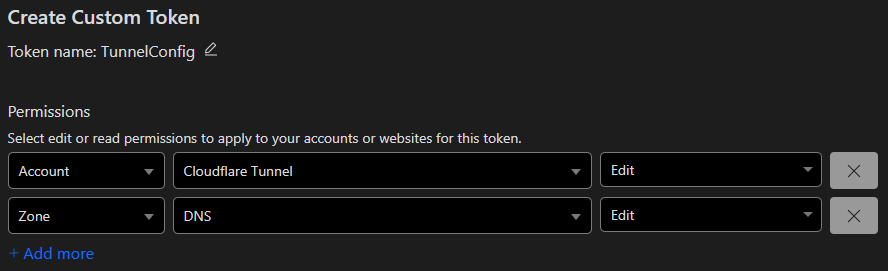
To get the API token from cloudflare go to API token page and create a new one with the following permissions
Account Cloudflare Tunnel EditZone DNS Edit
In the provider.tf file add the cloudflare, docker and random provider for generating the tunnel token.
 1
 2
 3
 4
 5
 6
 7
 8
 9
10
11
12
13
14
15
16
17
18
19
20
21
22
23
24
|
terraform {
  required_providers {
    docker = {
      source  = "kreuzwerker/docker"
      version = "~>3.0.2"
    }
    cloudflare = {
      source  = "cloudflare/cloudflare"
      version = "~>4"
    }
    random = {
      source  = "hashicorp/random"
      version = "~>3.6.3"
    }
  }
}

provider "docker" {
  host = var.docker_host
}

provider "cloudflare" {
  api_token = var.cf_api_token
}
|
and in the main.tf a docker network, the Cloudflare tunnel and the cloudflared container are created
 1
 2
 3
 4
 5
 6
 7
 8
 9
10
11
12
13
14
15
16
17
18
19
20
21
22
23
24
25
26
27
28
29
30
31
32
33
34
35
36
37
38
39
40
41
42
43
44
45
46
47
48
49
50
|
# Cloudflare tunnel setup and configuration

resource "random_string" "token" {
  length = 32
}

resource "cloudflare_zero_trust_tunnel_cloudflared" "vps" {
  account_id = var.cf_account_id
  name       = "vps-tf-blog"
  secret     = base64encode(random_string.token.result)
}

resource "cloudflare_zero_trust_tunnel_cloudflared_config" "vps" {
  account_id = var.cf_account_id
  tunnel_id  = cloudflare_zero_trust_tunnel_cloudflared.vps.id
  config {
    ingress_rule {
      hostname = "mealie-blog.irbe.ch"
      service  = "http://mealie-blog:9000"
    }
    ingress_rule {
      service = "http_status:404"
    }
  }
}

data "cloudflare_zone" "irbe" {
  name = "irbe.ch"
}

resource "docker_network" "cloudflare" {
  name = "cloudflare-blog"
}

data "docker_registry_image" "cloudflared" {
  name = "cloudflare/cloudflared:latest"
}

resource "docker_image" "cloudflared" {
  name          = data.docker_registry_image.cloudflared.name
  pull_triggers = [data.docker_registry_image.cloudflared.sha256_digest]
}

resource "docker_container" "cloudflared" {
  name         = "cloudflared-blog"
  image        = docker_image.cloudflared.image_id
  restart      = "always"
  network_mode = docker_network.cloudflare.name
  command      = ["tunnel", "--no-autoupdate", "run", "--token", cloudflare_zero_trust_tunnel_cloudflared.vps.tunnel_token]
}
|
Application container#
The application config is fairly simple, it creates the DNS record that points to the Cloudflare tunnel, pulls and creates the docker container and creates resources in the identity provider related to the application. For my demo application that supports different roles, in the single sign-on section I create a user and an admin role that can be assigned to users either manually in the Auth0 console or also by infrastructure as code.
 1
 2
 3
 4
 5
 6
 7
 8
 9
10
11
12
13
14
15
16
17
18
19
20
21
22
23
24
25
26
27
28
29
30
31
32
33
34
35
36
37
38
39
|
data "docker_registry_image" "mealie" {
  name = "ghcr.io/mealie-recipes/mealie:v2.4.2"
}

resource "docker_image" "mealie" {
  name          = data.docker_registry_image.mealie.name
  pull_triggers = [data.docker_registry_image.mealie.sha256_digest]
}

resource "docker_container" "mealie" {
  name         = "mealie-blog"
  image        = docker_image.mealie.image_id
  restart      = "unless-stopped"
  network_mode = docker_network.cloudflare.name
  volumes {
    host_path      = "/srv/docker/mealie-blog.irbe.ch"
    container_path = "/app/data"
  }
  env = [
    "LOG_LEVEL=debug",
    "ALLOW_SIGNUP=false",
    "RECIPE_PUBLIC=false",
    "TOKEN_TIME=720",
    "PUID=1000",
    "PGID=1000",
    "TZ=Europe/Zurich",
    "BASE_URL=https://mealie-blog.irbe.ch",
    "OIDC_GROUPS_CLAIM=http://schemas.irbe.ch/roles",
    "OIDC_ADMIN_GROUP=${auth0_role.mealie_admin.name}",
    "OIDC_USER_GROUP=${auth0_role.mealie_user.name}",
    "OIDC_AUTH_ENABLED=True",
    "OIDC_SIGNUP_ENABLED=True",
    "OIDC_CONFIGURATION_URL=https://${var.auth0_domain}/.well-known/openid-configuration",
    "OIDC_CLIENT_ID=${auth0_client.mealie.client_id}",
    "OIDC_CLIENT_SECRET=${auth0_client_credentials.mealie.client_secret}",
    "OIDC_REMEMBER_ME=True",
    "OIDC_PROVIDER_NAME=Auth0",
  ]
}
|
DNS settings#
The DNS settings are as simple as one resource block that creates a CNAME record in Cloudflare DNS pointing to the Cloudflare tunnel cname and with proxying enabled.
mealie.tf
1
2
3
4
5
6
7
|
resource "cloudflare_record" "mealie" {
  zone_id = data.cloudflare_zone.irbe.id
  name    = "mealie-blog"
  content = cloudflare_zero_trust_tunnel_cloudflared.vps.cname
  type    = "CNAME"
  proxied = true
}
|
SSO with Auth0#
To enable Auth0 configuration by Terraform we need to create a Machine to Machine application in Auth0.
- Go to Applications -> Applications and +Create Application
- Choose a meaningful name (e.g TFE VPS) and Machine to Machine Applications as application type
- Choose Auth0 Management API with at least the following permissions: read, create, update, delete for
role, client and client_credentials
- After creation go to the Settings page and write down the Domain, ClientID and Client Secret
Before the single sign-on config can be done we need to extend the variables.tf and providers.tf file with the Auth0 provider
providers.tf
 1
 2
 3
 4
 5
 6
 7
 8
 9
10
11
12
13
14
|
terraform {
  required_providers {
    auth0 = {
      source  = "auth0/auth0"
      version = "~>1.9.1"
    }
  }
}

provider "auth0" {
  domain        = var.auth0_domain
  client_id     = var.auth0_client_id
  client_secret = var.auth0_client_secret
}
|
variables.tf
 1
 2
 3
 4
 5
 6
 7
 8
 9
10
11
12
13
14
|
variable "auth0_domain" {
  type        = string
  description = "Auth0 domain"
}

variable "auth0_client_id" {
  type        = string
  description = "Auth0 client id"
}

variable "auth0_client_secret" {
  type        = string
  description = "Auth0 client secret"
}
|
Now in the applications configuration I create a new OpenID client in Auth0 and the two roles mentioned before. The client id and secret required for the single sign-on is then provided to the application in it’s environment section.
mealie.tf
 1
 2
 3
 4
 5
 6
 7
 8
 9
10
11
12
13
14
15
16
17
18
19
20
21
22
23
24
25
26
27
28
|
resource "auth0_role" "mealie_user" {
  name        = "role-mealieblog-user"
  description = "Members have the user role in the app Mealie"
}

resource "auth0_role" "mealie_admin" {
  name        = "role-mealieblog-admin"
  description = "Members have the admin role in the app Mealie"
}

resource "auth0_client" "mealie" {
  name            = "Mealie-Blog"
  app_type        = "regular_web"
  oidc_conformant = true
  callbacks = [
    "https://mealie-blog.irbe.ch/login"
  ]

  jwt_configuration {
    secret_encoded = true
    alg            = "RS256"
  }
}

resource "auth0_client_credentials" "mealie" {
  client_id             = auth0_client.mealie.id
  authentication_method = "client_secret_post"
}
|
Auth0 roles claim#
Additionally in Auth0 there is an action required to emit the roles claim in the id- and/or access token. Because I have separated my general Auth0 config from the application specifiy configuration this code lives in another Terraform workspace.
 1
 2
 3
 4
 5
 6
 7
 8
 9
10
11
12
13
14
15
16
17
18
19
20
21
22
23
24
25
26
27
28
29
30
31
32
33
34
35
36
37
38
39
40
41
42
|
resource "auth0_action" "token_user_roles" {
  name    = "Add roles to tokens"
  runtime = "node18"
  deploy  = true
  code    = <<-EOT
    /**
    * Handler that will be called during the execution of a PostLogin flow.
    *
    * @param {Event} event - Details about the user and the context in which they are logging in.
    * @param {PostLoginAPI} api - Interface whose methods can be used to change the behavior of the login.
    */
    exports.onExecutePostLogin = async (event, api) => {
      if (event.authorization) {
        api.accessToken.setCustomClaim(`http://schemas.irbe.ch/roles`, event.authorization.roles);
        api.idToken.setCustomClaim(`http://schemas.irbe.ch/roles`, event.authorization.roles);
      }
    };


    /**
    * Handler that will be invoked when this action is resuming after an external redirect. If your
    * onExecutePostLogin function does not perform a redirect, this function can be safely ignored.
    *
    * @param {Event} event - Details about the user and the context in which they are logging in.
    * @param {PostLoginAPI} api - Interface whose methods can be used to change the behavior of the login.
    */
    // exports.onContinuePostLogin = async (event, api) => {
    // };
    EOT
  supported_triggers {
    id      = "post-login"
    version = "v3"
  }
}

resource "auth0_trigger_actions" "login_flow" {
  trigger = "post-login"
  actions {
    id           = auth0_action.token_user_roles.id
    display_name = auth0_action.token_user_roles.name
  }
}
|
Conclusion#
I really like the immutable infrastructure approach of Terraform because at any time the code reflects the currently running configuration. This can be taken as some kind of documentation in contrast to a ClickOps deployment where (hopefully) a documentation has been written AND is updated periodically. Infrastructure as code gets even more powerful in combination with a Git repository and optionally integrated in CI/CD pipelines. When integrated with Git we automatically get traceability for the infrastructure config! Before I switched to the Terraform approach I’ve been using Ansible to deploy applications onto my VPS. Now I have a combination of both where sensitive information can be encrypted by Ansible Vault and then passed to Terraform.
Here is my Ansible playbook:
 1
 2
 3
 4
 5
 6
 7
 8
 9
10
11
12
13
14
15
16
17
18
19
20
21
22
23
24
25
26
27
28
29
30
31
32
33
|
- name: run terraform apply
  tags: tf
  delegate_to: localhost
  run_once: true
  vars:
    CF_API_TOKEN: !vault |
      $ANSIBLE_VAULT;1.1;AES256
      3561346437363461<redacted>
    CF_TUNNEL_TOKEN: !vault |
      $ANSIBLE_VAULT;1.1;AES256
      636133373465663<redacted>
    AUTH0_SECRET: !vault |
      $ANSIBLE_VAULT;1.1;AES256
      66343332306661<redacted>
    SMTP_PASSWORD: !vault |
      $ANSIBLE_VAULT;1.1;AES256
      61303963373038<redacted>
  community.general.terraform:
    state: present
    project_path: "vps-tf/"
    workspace: "vps"
    variables:
      auth0_domain: "irbe.eu.auth0.com"
      auth0_client_id: "<redacted>"
      auth0_client_secret: "{{AUTH0_SECRET}}"
      cf_account_id: <redacted>
      cf_api_token: "{{CF_API_TOKEN}}"
      cf_tunnel_token: "{{CF_TUNNEL_TOKEN}}"
      docker_host: ssh://[email protected]
      smtp:
        host: in-v3.mailjet.com
        user: <redacted>
        password: "{{SMTP_PASSWORD}}"
|
