Die Idee eine günstige VPN Lösung für Zuhause einzurichten kam mir als ich vom Büro aus diverse Sachen auf meinem PC Zuhause machen wollte und daher mehrere Port Forwards auf dem Router einrichten musste. Dies ist sicherheitstechnisch nicht gerade das intelligenteste; da könnte ich meinen PC auch gleich direkt am Cable Modem anschliessen und ein Schild anhängen: Hey ich bin so sicher wie ein Schweizer Käse.
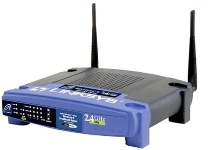
Als mein ehemaliger Router irgendwann seienen Geist aufgab und ich mich nach einem neuen umsehen musste traf ich ihn: Den Linksys WRT54GL mit einem Killerfeature, einer auf Open Source basierenden Firmware unter GPL.
 Die offene Firmware erlaubt es eine custom Firmware zu installieren, welche einerseits völlig frei konfigurierbar ist und Einstellungen ermöglich, die vorher verborgen waren.
Das HowTo:
Die offene Firmware erlaubt es eine custom Firmware zu installieren, welche einerseits völlig frei konfigurierbar ist und Einstellungen ermöglich, die vorher verborgen waren.
Das HowTo:
Installieren der DD-WRT Firmware
- Die aktuelle DD-WRT Firmwares auf www.dd-wrt.com herunterladen (
generic-miniundgeneric-vpn) - Zuerst muss die
generic-miniFirmware über das Webinterface installiert werden - Dannach beim Router (IP: 192.168.1.1) mit User: root Passwort:admin anmelden und die
generic-vpnFirmware installieren - Grundeinstellungen vornehmen (WAN, LAN, DHCP, WIFI etc.)
Erstellen der Public-Key-Infrastrucure
- Downlaod des OpenVPN Packets 2.1RC15 hier
- Installation des Packets mit allen Komponenten
- cmd öffnen
|
|
Die folgenden Variablen müssen entsprechend angepasst werden
set KEY_COUNTRY=US
set KEY_PROVINCE=CA
set KEY_CITY=San Francisco
set KEY_ORG=OpenManiak
set [email protected]
|
|
Country Name (2 letter code) [US]:
State or Province Name (full name) [CA]:
Locality Name (eg, city) [SanFrancisco]:
Organization Name (eg, company) [OpenManiak]:
Organizational Unit Name (eg, section) []:
Common Name (eg, your name or your server's hostname) []:host.domain.org
Email Address [[email protected]]:
Erstellen des Server Keys
build-key-server.bat
Loading 'screen' into random state - done
Generating a 1024 bit RSA private key
........................................................++++++
.........................++++++
writing new private key to 'keys\server.key'
-----
You are about to be asked to enter information that will be incorporated
into your certificate request.
What you are about to enter is what is called a Distinguished Name or a DN.
There are quite a few fields but you can leave some blank
For some fields there will be a default value,
If you enter '.', the field will be left blank.
-----
Country Name (2 letter code) [US]:
State or Province Name (full name) [CA]:
Locality Name (eg, city) [SanFrancisco]:
Organization Name (eg, company) [OpenManiak]:
Organizational Unit Name (eg, section) []:
Common Name (eg, your name or your server's hostname) []:server
Email Address [[email protected]]:

Please enter the following 'extra' attributes
to be sent with your certificate request
A challenge password []:
An optional company name []:
Using configuration from openssl.cnf
Loading 'screen' into random state - done
Check that the request matches the signature
Signature ok
The Subject's Distinguished Name is as follows
countryName :PRINTABLE:'US'
stateOrProvinceName :PRINTABLE:'CA'
localityName :PRINTABLE:'SanFrancisco'
organizationName :PRINTABLE:'OpenManiak'
commonName :PRINTABLE:'server'
emailAddress :IA5STRING:'[email protected]'
Certificate is to be certified until Sep 6 17:36:18 2017 GMT (3650 days)
Sign the certificate? [y/n]:y

1 out of 1 certificate requests certified, commit? [y/n]:y
Write out database with 1 new entries
Data Base Updated
Erstellen des Client Zertifikats
build-key.bat client

Loading 'screen' into random state - done
Generating a 1024 bit RSA private key
........................................................++++++
.........................++++++
writing new private key to 'keys\client.key'
-----
You are about to be asked to enter information that will be incorporated
into your certificate request.
What you are about to enter is what is called a Distinguished Name or a DN.
There are quite a few fields but you can leave some blank
For some fields there will be a default value,
If you enter '.', the field will be left blank.
-----
Country Name (2 letter code) [US]:
State or Province Name (full name) [CA]:
Locality Name (eg, city) [SanFrancisco]:
Organization Name (eg, company) [OpenManiak]:
Organizational Unit Name (eg, section) []:
Common Name (eg, your name or your server's hostname) []:client
Email Address [[email protected]]:

Please enter the following 'extra' attributes
to be sent with your certificate request
A challenge password []:
An optional company name []:
Using configuration from openssl.cnf
Loading 'screen' into random state - done
Check that the request matches the signature
Signature ok
The Subject's Distinguished Name is as follows
countryName :PRINTABLE:'US'
stateOrProvinceName :PRINTABLE:'CA'
localityName :PRINTABLE:'SanFrancisco'
organizationName :PRINTABLE:'OpenManiak'
commonName :PRINTABLE:'server'
emailAddress :IA5STRING:'[email protected]'
Certificate is to be certified until Sep 6 17:36:18 2017 GMT (3650 days)
Sign the certificate? [y/n]:y

1 out of 1 certificate requests certified, commit? [y/n]:y
Write out database with 1 new entries
Data Base Updated
Erzeugen des Diffie Hellman Schlüssels
build-dh.batKonfiguration des OpenVPN Daemons (Routing Mode)
☝️ in die Sektionen jeweils nur den Abschnitt zwischen –BEGIN CERTIFICATE– und –END CERTIFICATE– aus den Files kopieren (mit den genannten Linien!)
- Im Webinterface des Routers auf Services -> Services
- Start OpenVPN:
Enable - Start Type:
WAN Up - Public Server Cert:
ca.crt - Certificate Revoke List (CRL):
leer lassen - Public Client Cert:
server.crt - Private Client Key:
server.key - DH PEM:
dh1024.pem - OpenVPN Config:
|
|
- OpenVPN TLS Auth:
leer lassen
Erstellen der Firewall Policy
- Auf Administration -> Commands
- Im Feld Commands folgendes eintragen:
iptables -I INPUT 1 -p tcp -dport 1194 -j ACCEPT iptables -I INPUT 1 -p udp -dport 1194 -j ACCEPT iptables -I FORWARD 1 -source 192.168.66.0/24 -j ACCEPT iptables -I FORWARD -i br0 -o tun0 -j ACCEPT iptables -I FORWARD -i tun0 -o br0 -j ACCEPT - Save Firewall
Client Einstellungen
Folgende Dateien ins Verzeichnis C:\%ProgramFiles%\OpenVPN\config
ca.crt
client.crt
client.key- Neue Textdatei anlegen mit Endung: .ovpn
- Config einfügen und Hostname anpassen:
;Zielserver und Port remote host.domainname.org 1194 client ns-cert-type server dev tun0 proto udp resolv-retry infinite nobind persist-key persist-tun float ;Zertifikate ca ca.crt cert client.crt key client.key pull - Datei speichern
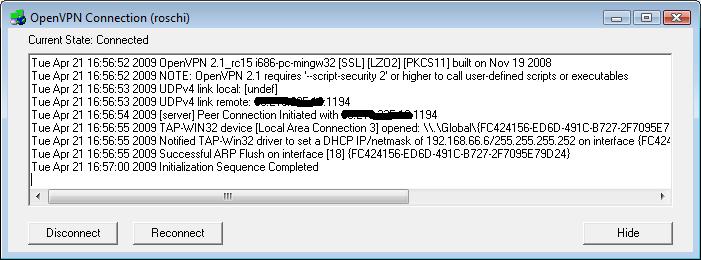
- OpenVPN Gui öffnen und in der Taskleiste doppelklicken